
Menu
How to Install Concrete Slabs in Miami Gardens Homes
Concrete Slab Miami Gardens
Installing a concrete slab represents a significant investment requiring careful planning, precise execution, and attention to countless details that determine long-term performance. Whether creating a foundation for a new structure, building a patio for outdoor entertainment, or installing a driveway to withstand daily vehicle traffic, proper installation techniques ensure surfaces remain level, crack-free, and functional for decades. Miami Gardens homeowners face unique challenges, including sandy soil conditions, high water tables, intense heat, and frequent rainfall that demand specialized approaches. Understanding critical installation phases and common pitfalls helps property owners make informed decisions and achieve outstanding results.
Comprehensive Site Evaluation and Preparation
All successful installations start long before the first concrete truck arrives on-site. A comprehensive site evaluation is performed to identify any potential issues and to plan accordingly. A site evaluation will assess the soil conditions (soil composition), drainage patterns, existing vegetation, underground utilities, and accessibility to the site. Due to the sandy soils present throughout Miami Gardens, these provide excellent drainage; however, they may need to be stabilized. The clay-based soils found in many of Miami-Dade County’s communities retain moisture and expand when wet, which can create significant pressure on concrete and cause cracking. Performing soil tests before construction will help determine the bearing capacity of the soil and the necessary preparation for the site.
Locating underground utilities is essential to prevent damage to these systems and to prevent accidents and injuries during excavation. Prior to commencing any excavation activities, call 811 to have the underground utilities located on your site. This service is provided at no cost to you and will mark the location of all buried utilities. This is an essential safety precaution for all sites, regardless of the project size.
Excavation and Soil Compaction
The depth of the excavation will depend on the type of base material that is used and the thickness of the concrete. Most residential applications require excavating the top 6-8 inches of soil to allow for a 4-inch-thick base and a 4-inch-thick slab of concrete. The top 6-8 inches of soil are comprised of organic materials that break down over time, creating voids that contribute to settlement. By removing the top 6-8 inches of soil and replacing it with engineered fill, you will have a much more stable foundation for your structure.
One of the most important and least performed tasks in preparing a site for a concrete slab is soil compaction. When soil is compressed due to the weight of the concrete, it will settle unevenly, causing cracking and surface irregularities. Mechanical compactors will systematically compress the soil particles, increasing the density and load-bearing capacity of the soil. Multiple passes with a vibratory plate compactor will ensure that the entire area has been sufficiently compacted. Once the soil has been properly compacted, testing the compaction will verify that the soil has achieved the desired level of density, as specified in the plans.
Base Layer Installation and Grading
A properly prepared base layer provides a strong and stable platform for your slab and also promotes drainage. Crushed stone or gravel is typically the best option for a base layer because it is strong and permeable. Base material should be applied in 2-inch thick lifts and compacted thoroughly after each lift. This process will ensure uniform density of the base material throughout the full depth of the base. Most residential installations will require 4-6 inches of compacted base, depending on the soil conditions and intended use of the slab.
Grading of the base layer is equally as important as the base layer itself to prevent future drainage issues. All surfaces should slope away from the buildings at a minimum rate of 1/4 inch per foot. This slope will promote drainage while being imperceptible to users. Communities such as Carol City and those near Lake Lucerne will need to consider the surrounding terrain and ensure that the water runs off towards the designated drainage areas, and not onto neighboring properties or building foundations.
Moisture Barriers and Vapor Retarders
Vapor barriers are used to protect the concrete from moisture from the ground in certain applications. Typically, vapor barriers are used for foundation slabs that will support structures. Polyethylene sheeting or specialized vapor retarders should be applied to the base of the slab to prevent moisture from migrating from the soil to the concrete, and subsequently into the structures above. Choose a vapor barrier that meets ASTM E1745 specifications for the correct level of permeance for your application.
If a vapor barrier is to be used, install the concrete directly on the vapor barrier and do not embed a layer of fill material between the vapor barrier and the concrete. Moisture trapped in the fill layer will extend the drying time and could potentially lead to problems in the long run. Proper installation includes overlapping seams of the vapor barrier, sealing all penetrations, and protecting the vapor barrier from punctures during concrete placement. Details like these greatly affect the ability of the vapor barrier to perform and the overall performance of the concrete.
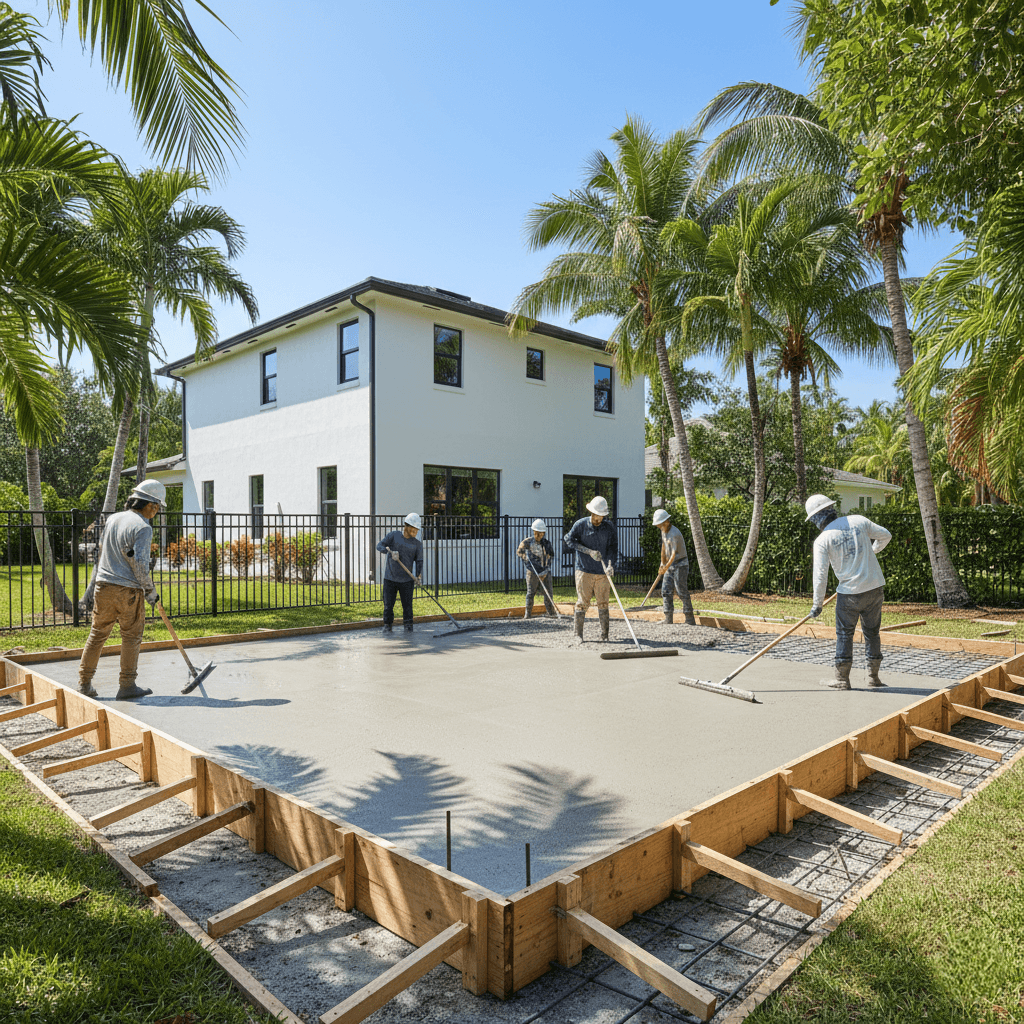
Formwork Construction and Placement
The quality of the formwork will establish the dimensions of the slab, ensure the proper thickness, and serve as a reference for the screeding operation. Straight lumber without warpage, knots, or damage is recommended for formwork. 2×4 lumber is typically used for standard 4-inch slabs, and larger form boards are needed for thicker installations. Forms should be secured with stakes, which should be driven into the ground every 2 feet along the length of the form. Stakes can be driven into the ground with a 3-lb sledgehammer, and the hammer will provide a great deal of accuracy.
It is very important to ensure that the forms are square to each other. This is accomplished by using the “three-four-five” method. Measure 3 feet along one side, 4 feet along an adjacent side, and confirm that the diagonals measure 5 feet. This simple geometric check will confirm that all right-angle corners are perfect. All forms should be leveled carefully, taking into consideration the slopes of the slab and establishing consistent elevation references. Release agents should be applied to the inside of the forms to make the removal of the forms easier once the concrete has cured. Sites in the vicinity of the Palmetto Expressway and those in the Norland community require careful placement of the forms to ensure compliance with setbacks and property lines.
Reinforcement Installation
Steel reinforcement greatly enhances the performance of the concrete by controlling the width of cracks and providing tensile strength. Wire mesh is suitable for lightweight applications such as patios and sidewalks. Rebar is stronger and is usually used for driveways, garage floors, and heavily loaded areas. The reinforcement should be installed in a grid pattern and at the proper spacing, as dictated by the engineer. Number 3 or 4 rebar is commonly used for residential slabs and should be spaced 12-18 inches apart.
Position the reinforcement in the lower 1/3 of the slab thickness using plastic chairs or metal supports. Installing the reinforcement on top of the base prevents it from functioning as intended. The proper position will ensure that the reinforcement is embedded within the concrete mass where it can resist tensile stress effectively. Secure all intersections with wire ties to prevent the reinforcement from shifting during concrete placement. Splice the reinforcement together a minimum of 12 inches to ensure continuity throughout the reinforcement system.
Concrete Mix Selection and Ordering
Specifying the proper mix of concrete will provide the necessary strength and durability for your application. Residential slabs require a minimum of 3000 psi of compressive strength; however, 4000 psi is recommended for most applications. Miami Gardens’ humid climate requires the use of air-entrained concrete to withstand damage caused by moisture absorption and thermal cycling. Specify a minimum of 5% to 7% air entrainment to enhance the durability of the concrete.
To ensure that you have sufficient amounts of concrete, calculate the amount of concrete needed based on the length, width, and depth of the slab. Multiply the length and width, and multiply this total by the depth to obtain the volume of concrete in cubic feet. Divide the volume of cubic feet by 27 to convert the volume to cubic yards. Add 5-10% to account for waste and slight variations. Delivery of ready-mix is usually the most convenient option for jobs greater than one cubic yard. Deliveries should be scheduled for cooler morning hours whenever possible, as the hot afternoon sun in South Florida will expedite the setting process and make the finishing process much more difficult.
Delivery Coordination and Site Access
Careful coordination of the delivery schedule is crucial to ensure that there is adequate crew availability and acceptable weather conditions. Do not pour concrete during extreme temperatures, high winds, or when rain is predicted. Ready-mix trucks will require clear access to the pour location and a solid surface to prevent becoming stuck. Develop a route from the street to the pour location and remove obstructions and protect landscaping. There should be at least three assistants available for each residential pour to assist with placing the concrete, screeding, and finishing prior to the concrete reaching its limited working time.
Concrete Placement and Consolidation
There are several key factors involved in a successful concrete placement and consolidation procedure. Uniform distribution of the concrete throughout the forms will be accomplished by systematic placement procedures. Concrete should be placed into the forms starting at the corners and moving systematically outward. Shovels or concrete rakes should be used to distribute the material uniformly and to maintain even depths throughout the slab. To prevent segregation, avoid allowing the concrete to fall excessively far or travel horizontally for long lengths of time, and separate the aggregate from the cement paste.
Immediately following placement of the concrete, the concrete must be consolidated to remove any air pockets and to ensure complete coverage around the reinforcement. Thicker slabs and/or areas heavily reinforced may require the use of vibrating equipment to thoroughly consolidate the concrete. However, excessive vibration can cause segregation; therefore, mechanical consolidation should be used judiciously. Most residential slabs can be consolidated by simply screeding and floating operations without needing special vibration equipment.
Screeding and Surface Finishing
Screeding is the operation of leveling the concrete to the proper elevation, utilizing the top of the forms as a reference. Screeding involves working a straight edge back and forth over the forms, removing high areas and filling in low areas. Repeat this operation until a uniform elevation of the surface is obtained. This is an extremely important operation and establishes the initial surface flatness and the proper thickness of the slab. Communities such as Scott Lake and those near Rolling Oaks require careful attention to be made to specified grades and elevations.
After screeding, follow with the initial floating operation, which will smooth the surface of the concrete and embed larger aggregate particles into the surface of the concrete. Bull floats are the best tool for larger areas, and hand floats are best suited for smaller slabs and tighter spaces. Follow the bull float with hand floats to eliminate any ridges left behind from the bull float and to produce a uniform texture. Allow enough time for the bleed water to evaporate before starting the final finishing operations. If the final finishing operations are started too soon, the bleed water will be trapped near the surface and can cause scaling and reduced durability of the concrete.
Edging and Jointing
All perimeter edges should be edged using edging tools to create rounded corners that will be less susceptible to chipping. Edges should be worked back and forth along the forms with a slight lift at the leading edge of the edger to prevent scratching the surface of the concrete. Edges that are well-formed will result in improved appearance and increased durability. Control joints should be installed at predetermined locations to direct the path of cracking as the concrete dries. Typically, control joints are spaced 8-10 feet apart in both directions, resulting in squares of almost the same size.
Control joints should be cut using groover tools and a straight edge. The joint depth should be 1/4th of the slab thickness. The purpose of installing control joints is to create a weak point in the slab where the cracking will occur in an organized manner, instead of randomly occurring.
For larger slabs or when immediate jointing is not feasible, saw-cut joints within 12-18 hours after placement using masonry blades.
Final Finishing and Texturing
The final finishing operation will produce the desired appearance and texture of the surface of the concrete. Steel troweling will produce a smooth, dense surface ideal for protected interior applications. Exterior surfaces require texture for traction and aesthetic reasons. Broom finishing is the most common and is produced by dragging a soft-bristled broom across the surface of the concrete in a straight line or curved arc. The texture of the finish can be varied by changing the pressure applied to the broom and the stiffness of the bristles.
Timing the final finishing operation is very important to produce quality results. The finishing operation should be started when the concrete will support the weight of the personnel walking on it without excessive indentation, typically when a footprint will remain about 1/4 inch deep. Starting the finishing operation too early will result in excess water rising to the surface. Finishing the operation too late will make it difficult to achieve a uniform texture. Due to the warmer temperatures in Miami Gardens, the hardening process will be accelerated, and the finishing operation will likely be shorter than in cooler climates.
Curing Procedures and Protection
Curing is essential to maximize the strength and durability of the concrete by keeping the concrete moist during the hydration reaction. Apply a curing compound to the surface of the concrete immediately after finishing to create a protective membrane that will slow the rate of evaporation. Alternatives to applying a curing compound include covering the surface of the concrete with plastic sheeting and/or continuously misting the surface with water to keep it continually wet. Curing should continue for a minimum of 7 days. Longer curing periods will provide additional strength gains to the concrete.
Do not permit pedestrian or vehicular traffic on freshly placed concrete for a minimum of 24 hours and 7 days, respectively. Permitting premature traffic on fresh concrete can damage the surface or create cracks. Protect the freshly placed concrete from the effects of rapid drying from the sun and wind. Providing shade to the concrete during the hottest part of the day is a reasonable solution. Communities such as Vista Verde and those near the Andover Community will require diligent curing protection to ensure the concrete develops the desired strength and durability.
Form Removal and Joint Sealing
Forms should be removed from the freshly placed concrete after the concrete has developed sufficient strength, usually 24-48 hours, depending on the conditions. Prying forms away from the edges of the slab should be done carefully to prevent chipping the corners. Inspect the edges of the slab and repair any minor imperfections using a patching compound. Seal the control joints after the concrete has fully cured to prevent debris from accumulating in the joints and to simplify future maintenance. Flexible joint sealants will accommodate the movements of the concrete while protecting the joint face.
Common Installation Mistakes to Avoid
Learning about some of the most commonly made mistakes when installing concrete will help you avoid many expensive potential problems. The biggest single mistake is inadequate base preparation. This is usually what causes the majority of your concrete slabs to have settlement cracks and other issues. Never pour any type of concrete onto loose dirt (or sand) without first properly preparing and compacting the base.
Additionally, using too little reinforcement or placing it incorrectly can compromise the structural integrity of your concrete slab. Your reinforcing steel should be positioned inside the slab where it will be able to withstand the stress on it as the slab dries and settles.
The water-to-cement ratio will greatly affect the strength and amount of shrinkage of your concrete. Do not add additional water to improve the workability of your concrete; doing so will dramatically reduce its strength. Incorrect timing of your finishing operations will either add excess water to the surface of the concrete or make it nearly impossible to get an even finish.
Weather conditions can also create several problems in installing concrete. It is best to schedule your installation at times when there are no extreme weather conditions, such as extreme heat/cold, or wind.
Advantages of Professional Installation of Concrete Slabs
While homeowners may complete small projects, experienced professionals will normally obtain better results for most applications. A professional contractor has access to specialized equipment such as screeds, floats, finishing machines, and power trowels, which enables them to efficiently perform their work in a high-quality manner. Professionals know how to prevent costly mistakes and ensure they comply with all applicable building codes and industry standards.
Professionals are also able to complete the installation and finishing of the concrete before it becomes too difficult to do so. This is important since concrete has a relatively short “working time” during which it can be placed and finished. Professionals are knowledgeable about the unique climate and soil conditions found in Miami Gardens and use proven methods to achieve success in these environments. Finally, a professional contractor provides homeowners with insurance and warranty coverage, protecting homeowners from liability and providing a recourse mechanism in the event that problems arise. Miami Gardens Concrete Pros provides residents with professional concrete slab installation services utilizing both skilled laborers and quality products, along with proven methods to consistently produce superior results for both residential and commercial customers.
LATEST POSTS